
In this article I will describe a Git workflow and branching model that I have used successfully in several projects and companies for many years now. It scales from small to large teams, and it fixes some common problems with Continuous Integration and GitFlow, for instance. Moreover, it is very simple and results in a nice Git history.
Most of what is described here is based on my personal experience and preferences. Things like naming conventions and versioning schemes can of course be modified, and I also give some examples of variations of the branching model. The key point is that this is a tried-and-tested model that works well, and it may be worth considering it if you are starting a new project.
Note that this article is written on a conceptual level rather than as a Git manual (the reason being that it is impossible to accommodate for all possible project and tool setups).
Stable mainline?
The stable mainline model tries to address the problem of broken builds. To give the context, the mainline is the branch that most developers work against (often called master in Git projects), and stable means that it is in a good enough shape so that all developers can work at full force without being blocked by failing builds.
The problem has been discussed and described in length, e.g. by Yegor Bugayenko (here, here and here), Paul Hammant (here), Henry Lawson (here), and of course by many, many others.
The root cause of broken builds is that most implementations of Continuous Integration do integration tests after integration. The solution (dubbed as “not rocket science” by Graydon Hoare) is of course to do integration tests before integration instead.
In fact, Continuous Integration (by design) does not give any guarantees about the stability of the mainline branch. Instead, it advocates that when the mainline breaks, the highest priority for all developers is to fix the problem. In any event, many developers will be unable to do proper work whenever mainline is broken.
The bigger a team gets, the more problematic broken builds are. The situation easily escalates if you have several teams working on the same code base (for instance front end vs back end, iOS vs Android, UI vs core, etc), and it can be a real pain if teams are working in different offices, or even in different time zones.
It is easy to see that large amounts of time, resources and money can be wasted on broken builds (and unfortunately that’s the case in many projects).
This article describes a model that prevents broken builds, by design.
Branches
In this model, there are three types of branches: the master branch, feature branches and release branches.
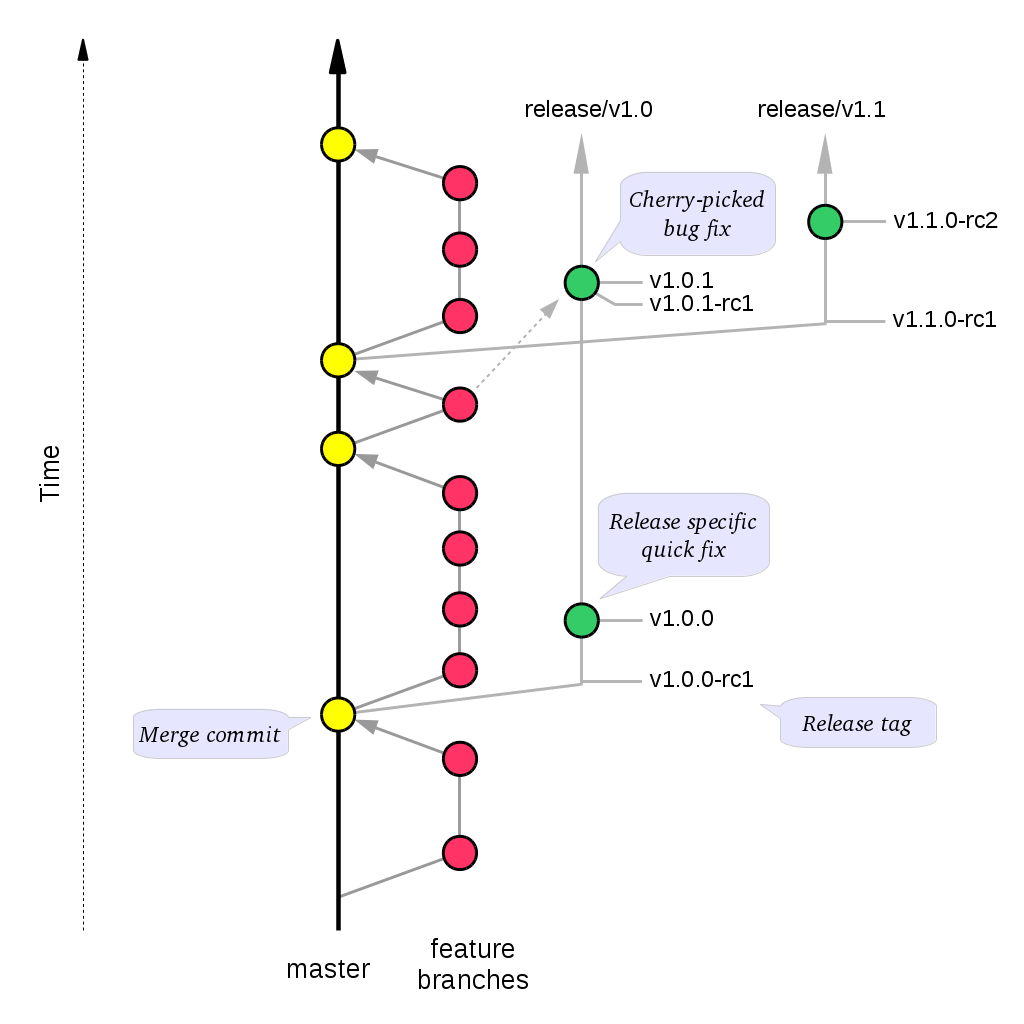
A stable mainline branching model for Git [SVG]
Main branch
There is only one eternal, canonical branch: master.
For most purposes, the master branch is considered stable. In other words, if you check out the master branch you can expect that:
- It builds on all supported platforms/targets.
- All unit tests pass (as well as static tests, linter checks and the like).
- A “standard run” of the software works (e.g. if it’s a GUI application, you should be able to launch it and do some basic operation).
However, the master branch might not pass a comprehensive QA test at all times.
Feature branches
All development is done in dedicated (relatively short lived) feature branches. This is where most of the action takes place, including:
- Feature development.
- Code review.
- Integration testing.
A feature branch branches off from master, and once development is finished and all the integration criteria have been met, it is merged back to the master branch.
A feature branch is typically called feature/ticket_description, where ticket is a reference to the corresponding ticket in the project issue tracker (if applicable), and description is a very short description (up to five words or so) of the purpose of the branch.
Example: feature/MP-1234_dynamic_reflow
Release branches
A release branch is essentially a fork of the master branch; it is never merged back to the master branch.
The main intent of a release branch is to freeze the code, and to have a point to fall back to if a hotfix is required in the future (e.g. if a customer needs a critical bugfix without consuming all the changes that have been made on master).
Given a regular major.minor.patch version numbering scheme (e.g. semantic versioning), a release branch should be named release/vX.Y, where X is the major version number and Y is the minor version number.
Example: release/v1.3
Release tags
In addition to release branches, release tags are created for each actual release (this may include release candidates that are intended for QA or beta testing, as well as public or customer releases). The release tags are made in the corresponding release branch.
The commit that represents a specific release is tagged with a tag named vX.Y.Z, optionally suffixed with a textual identifier, such as -rc1, -beta or -some-customer.
Example: v1.3.1-rc2
Feature development
As mentioned earlier, all development takes place in feature branches – no development is done directly on master.
There are several reasons for this:
- It makes it easy to do code review and integration tests before the code hits master, thereby guaranteeing that the master branch is always in a good shape.
- Having a single way of doing things makes life easier for everyone. No ambiguities. No special cases.
- The information about what commits belong to a certain feature or task is clear.
The details of how the development cycle works depends on what CI and code review tools you use, but here is an example.
Development
- A feature branch is created locally, based on the latest master from origin.
- Iterate until done:
- The feature is developed, and commits are made to the local feature branch.
- The developer runs unit tests and other checks locally, and fixes any regressions if necessary.
- If necessary, the feature branch is rebased locally on the latest master from origin.
Integration
- The branch is pushed to a centralized repository that is used for code review and CI testing.
- Iterate until stable:
- Reviewers point out issues that the developer then fixes.
- Builds are done and tests are run on the CI server, and the developer fixes any reported issues.
- Once the branch is considered good, the commit history is cleaned up as needed, and the branch is force pushed to the remote.
- If necessary, the branch is rebased on the latest master, and force pushed to the remote.
- The branch is merged to the master branch using a non-fast-forward merge commit.
Creating a release
There are essentially two kinds of releases:
- Standard releases, that include new features from master.
- Patch releases, that fix bugs or problems in earlier releases.
The main difference between the two is that standard releases are based on master, while patch releases are based on previous release branches. Otherwise the processes for the two are very similar.
Standard release
Once it has been decided what version number to use and what commit to base a release on, a new release branch is created from the selected commit, with a name based on the selected version number (as described earlier, i.e. release/vX.Y, where X and Y are the major and minor version numbers, respectively).
The initial purpose of the release branch is to feature-freeze the release, while keeping the master branch open for continued development.
Release stabilization
To stabilize the release branch, the following process is iterated until a final release is ready:
- Create a new release tag on the release branch. The tag is named vX.Y.0-rcN.
- .0 (zero), because this is the first release version from the vX.Y release branch.
- -rcN, where N is an increasing number (starting at 1), indicates that this is a release candidate.
- Build the release using your build / release process (e.g. trigger a build factory in the CI system).
- Put the build through the required testing process (e.g. QA and/or thorough system testing).
- Fix any bugs that are found, and commit the fixes to the release branch (see below).
When no more bugs are found, tag the tip of the release branch with vX.Y.0 (it is no longer a release candidate), and if necessary make a final build (e.g. to get the release number correct in the release package etc).
Fixing bugs on the release branch
Any bugs that are found in a release candidate can be fixed in one of two ways.
Proper fix on master
The preferred way to fix a release bug is to implement the fix on master, using the conventional feature development process, and then cherry-pick the bug fix commit(s) to the release branch.
The advantages are that the fix will automatically be included in future releases, and it will be subject to the standard integration process (i.e. all the regular quality measures apply).
Quick-fix on the release branch
If the fix is too complex to implement properly in time for the release (e.g. if the bug is a symptom of a bigger architectural problem), or if the corresponding fix on master would be incompatible with the release branch, one option is to make a quick-fix on the release branch.
When doing so, it is important to create a ticket for fixing the bug properly on master, and preferably start working on it right away.
Patch release
A patch release is created from an existing release branch. For instance, if v1.2.0 needs a critical patch, the patch is applied on top of the release/v1.2 branch, and then the regular release stabilization process is performed (except that tags now use the name of the new version number, for instance v1.2.1-rc1).
Working with feature branches
Let us dive deeper into some aspects of working with feature branches.
The importance of staying on the latest master
The key to maintaining a stable mainline is that all integration tests are done on a branch that is identical to what master will look like once the branch has been integrated.
If a feature branch is based on an old master, it is fully possible that merging the branch into master will break it, even if all tests passed on the feature branch and there were no merge conflicts. This is in part because there is always the risk of logical conflicts, but more generally it is important to understand:
Unless the state of the feature branch is identical to the post-integration state of the master branch, any build and test results from the feature branch are meaningless.
In a busy project with many concurrent feature branches, this requirement can cause race conditions. E.g. if two feature branches are ready to be integrated (i.e. the code review and all integration tests have passed for both branches), only one of the branches must be integrated. The other branch must be rebased on top of the new master, all the tests need to be rerun, and potentially new code has to be submitted (in case of conflict resolutions or new fixes) that needs to be reviewed.
The best solution is to prevent merges of outdated branches to master altogether (e.g. using concepts such as protected branches), and if possible automate the rebase + rerun tests + merge step (e.g. using a merge bot).
Avoid long-lived feature branches
A key principle in Continuous Integration is to integrate often. The workflow described in this article is slightly different, but in general the same principles apply:
If you let your feature development run in a track parallel to master for too long, you will end up with difficult integration issues (conflicts, outdated code, …).
There are several good practices and solutions to this problem that work well with the stable mainline principle.
Rebase often
When working on your feature, make it a habit to rebase your branch often – preferably several times per day (local rebasing is cheap!).
You can think of the rebase operation as a local integration. Although you do not necessarily publish your branch to the rest of the team, you still make sure that you are up to date with what is happening on master.
Split larger tasks into smaller work packages
In most cases, a large task can be split into smaller work packages. This can be done both when planning tasks (e.g. during sprint planning), and during feature development.
For instance, if a feature branch is running longer than anticipated, consider breaking out a part of the feature that can meet all stability requirements and integrate it to master (using the normal process). Immediately start a new feature branch (either with a new ticket ID or as a continuation of the old ticket), and continue development there.
But what about …?
Sometimes long running feature branches are hard to avoid. A typical scenario is a complete refactoring or replacement of a core software module; iterative integration may add lots of extra work for keeping two parallel code paths alive, together with extra build and/or runtime logic. Sometimes that extra overhead can be avoided by letting the development carry on in a feature branch until it is ready.
In such situations you should continue to do frequent rebases to minimize the integration cost once the feature is finished, and also put some extra effort in team coordination.
However, there are many ways to minimize the life span of a feature branch. Exactly which method is best depends on the nature of your feature and code base. One fairly generic strategy for big refactoring tasks is branch-by-abstraction.
Sharing work between feature branches
With short lived feature branches there is seldom a need to base a feature branch on a state that has not yet been integrated to master. Should the need arise, however, there is a practical method that can be used:
- Create a new new feature branch from the branch that contains the required state (the source branch).
- As long as the source branch is in development:
- Develop and make commits to the feature branch.
- If necessary, rebase the feature branch on top of the latest source branch.
- Once the source branch has been integrated into master, rebase the feature branch on top of the latest master.
- Continue development as usual.
Note: To avoid problems if the new source branch (or master) has had its history rewritten compared to the old source branch (on which the feature branch is based), you should use the --onto option when rebasing (see the git rebase documentation for examples). For example:
git rebase --onto new-source old-source my-branch
Here, old-source is the commit on which my-branch is based (and new-source is its new base).
Having one branch follow another branch comes with some risks though. One is that once the source branch has been integrated into master, it may have diverged from the original design upon which the feature branch was based (e.g. because of conflict resolutions and/or code review fixes). This means that there is a high probability that the commits on the feature branch are incompatible with the latest master, so a re-design may be necessary.
Sharing a feature branch between developers
Most of what has been described so far assumes that development is carried out in local branches. However, the methodologies can easily be extended to cooperation on a shared branch.
When working on a shared branch, the branch needs to be pushed to a shared remote (typically origin), and then several developers can fetch the branch and work on it locally.
Development
Developers will typically pull changes from the remote branch, make commits locally, and push their changes to the remote. Here are some good practices:
- First of all, people that work on the shared branch should keep in contact and communicate intents and changes (e.g. verbally and/or via a chat channel).
- Pull changes from the remote regularly, using
git pull --rebase(that way local commits are automatically rebased on top of the latest changes from the remote). - Push changes to the remote regularly.
Rebasing
If rebasing (or history rewriting) is required, it is important to create a new branch each time the branch is to be rebased. The new branch should have the same name as the original shared feature branch, but with an increasing numeric suffix. E.g. when rebasing feature/MP-123_add_sql_datastore, call the new branch feature/MP-123_add_sql_datastore-2. (and then -3, etc), e.g. like this:
git pull --rebase
git checkout -b feature/MP-123_add_sql_datastore-2
git rebase origin/master
git push -u origin feature/MP-123_add_sql_datastore-2
Now, all developers that are working on the branch should switch to the new branch (and optionally cherry-pick any local work that they had on the old branch that were not included in the rebased branch), and continue development as usual.
Note: This way of doing rebases is only required for branches that exist on remotes (such as shared branches). See The Perils of Rebasing from the Pro Git book for more information (in short: “Do not rebase commits that exist outside your repository”).
Additional notes
About commit messages
While not really imperative for the branching model, it is worth reiterating that commit messages should follow the common git conventions for commit messages.
In addition, it is often helpful if commit messages are prefixed with a ticket number (when applicable). This information comes in handy when doing git blame, or when cherry-picking individual commits (e.g. when cherry-picking a bug-fix commit from master into a release branch, the resulting history will be more informative).
Example: MP-1234: Add a unit test for dynamic reflow
About test coverage and speed
Strive for doing as much testing as possible in feature branches, before integration to master. The goal is, of course, to keep the master branch as stable as possible at all times.
At the same time it is important that all tests that are done on feature branches are very fast, so that integration is not blocked by testing. Also, it is important that a developer can get test results back as fast as possible in order to fix any problems. Having to iterate through a slow test cycle is very inefficient, and can even hurt the quality of the software.
Thus, it is important to find a good balance between speed and test coverage. For instance, it may be better to exclude extensive system tests from the tests that are done on feature branches (they can be done in nightly tests from the master branch instead).
It is equally important to continuously monitor the time it takes to run the integration tests, and optimize the test cycle whenever necessary. In my experience the time for the complete build & test cycle (for all relevant targets) should not be more than a couple of minutes.
Local testing
In addition to doing automated server-side testing, it is very useful to be able to run at least a subset of the integration test suite locally. For instance, fixing style guide issues, potential memory leaks, broken unit tests etc before submitting the code to code review can save a lot of work and frustration, especially as more people are involved once a feature branch has been made public.
At the same time the tests must be easy to run locally, or developers will not run them.
Version specific release artifacts
When making a release it is common that you need to produce version dependent release artifacts such as release notes, software documentation and API headers with correct date stamps and version numbers etc.
To make the release process smooth (and less susceptible to human errors), such artifacts should be automatically generated as part of the build process. In particular, you should avoid keeping them under version control in the master branch, since that would complicate the release branch handling (release branches should not be merged back to master, and the release artifacts are not fixed until the release is finalized).
Variations
Different projects have different needs, and the branching model presented in this article may not be a perfect fit for every project. However, with a few modifications it can easily be made to work in a wide range of situations. A few such examples are given below.
Always using fast-forward merges
In some environments, with some tools, it may be hard to guarantee the atomicity of a non-fast-forward merge. If you find yourself spending too much time fighting the tools at hand, an alternative may be to use fast-forward merges instead, especially if your tools support such a workflow.
This is very similar to the Cactus model described by Jussi Judin.
The main difference is that you will get a master branch completely free of merge commits, which has both advantages and disadvantages.
| Non-fast-forward (–no-ff) | Fast-forward (–ff-only) |
|---|---|
| Preserves information about which commits belong to a certain feature. | Information about feature branches is lost. |
| Possible to relax requirements for commits that are not on the tip of a feature branch (e.g. the merge commit is guaranteed to build on all platforms, but in the feature branch you may split different platform implementations into different commits). | If you want all commits on master to be “stable” (you should!), you need to be more strict about commits in feature branches, or always squash feature branches into a single commit. Keep in mind that most CI setups only check the tip of a feature branch. |
| Unless your tools enforce rebased branches (most Web based Git front ends don’t), there is no guarantee that a non-fast-forward merge will result in a linear history. | With fast-forward merges, a linear history is guaranteed. |
Please note that with fast-forward merges, using well phrased commit messages prefixed with ticked IDs becomes much more important. Otherwise it is very hard to see which commits belong to a certain feature.
Also keep in mind that using fast-forward merges does not automatically guarantee that the integration testing that was performed on a feature branch is still valid on the master branch. The situation is the same as with non-fast-forward merges: you either need good support from your Git / CI tool chain, or you need to do the integration manually.
Alternative release/deploy models
The release model described in this article is based on the assumption that a semantic versioning model (or similar) is used. In fact, almost any other release model can be used without altering the stable mainline model (i.e. how feature development, testing and integration to master is done).
No release branches
For simpler projects, there may not be a need to have any specific releases. For instance, the master branch may be considered stable enough at all times (provided that proper testing is done).
If you want to do specific release builds, you can pick a stable commit on master and tag it with a release tag and do a build from it.
Environment branches
In some projects it is natural to differentiate between different levels of stability by defining different environments, such as Development, Staging and Production.
This can be accomplished by treating the master branch as the Development environment, and add two more eternal branches: staging and production.
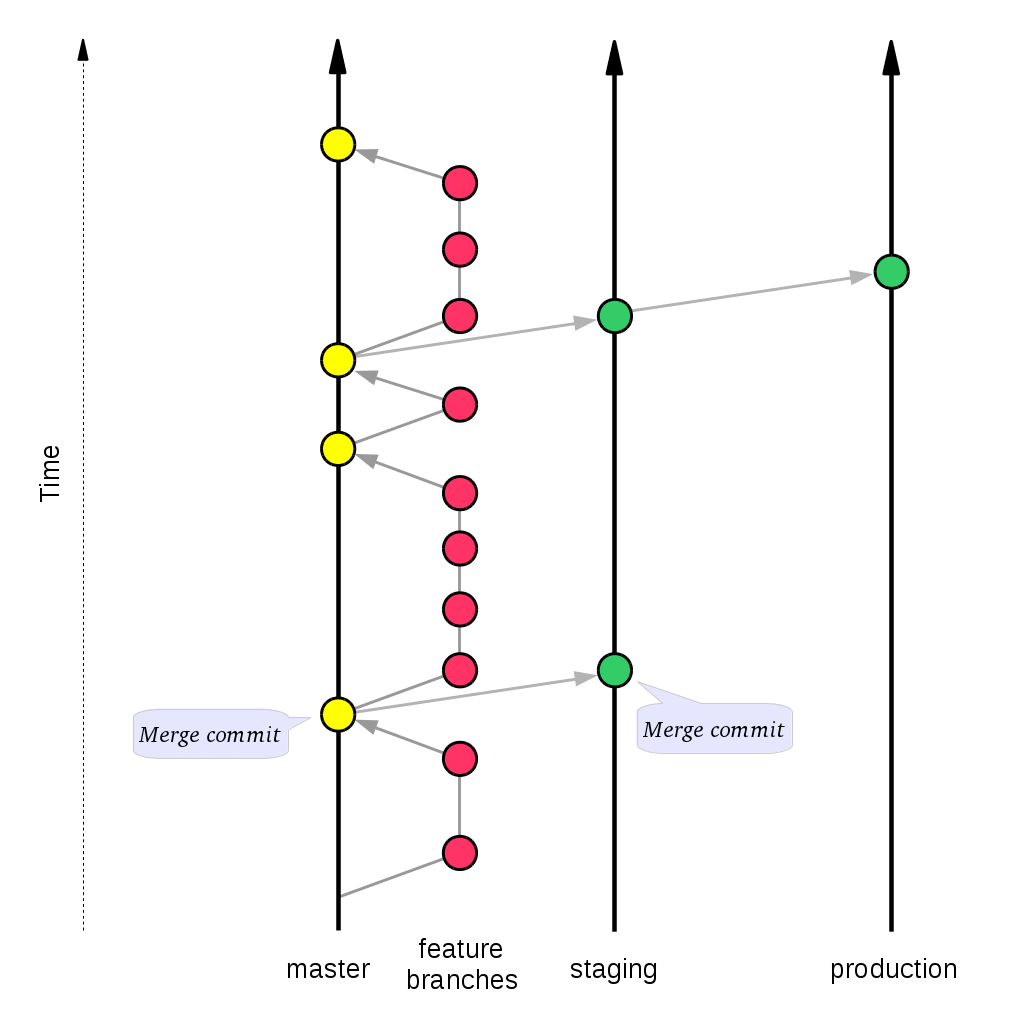
A stable mainline model for environment branches [SVG]
The code from master can then be deployed to Staging by merging the desired state of master into the staging branch. Likewise, Staging is deployed to Production by merging the desired state of the staging branch into the production branch.
Note that fixing bugs that are found in Staging or Production is done similarly to how release fixes are described for release branches, i.e. preferably on master and then cherry-picked (or merged) to the given environment. No development is done on the deployment branches, and the deployment branches are never merged back to master.
Great post! I find very interesting your posts and discussions around Git.
I reckon similarities between your “stable mainline for environmental branches” and this one here: http://www.josra.org/blog/An-automated-git-branching-strategy.html
However, in the later, staged and production branches are just “movable branches” – performed by fast forwards merges upon successful quality gates (adequate for a Continuous Delivery set-up). Any though on this? Thanks 🙂
Thanks for the link!
Yes, the methods are quite similar. IMO the details of the release process/branching is not central to the stable mainline concept, as long as release/stable/staging/… branches never affect the state of master.
However, the approach taken in the linked article seems to miss some points regarding code review. The way I see it, code review and automated build/testing should be iterated together (if a review issue is fixed, integration tests need to be re-run, and conversely if a test failure is fixed, the fix needs to be reviewed).
Also, I strongly feel that rebasing is the better option (and tools should help and automate that as far as possible).
Otherwise I fully agree that the integration/merge to master should be completely automatic, and using fast-forward-only release branches is an elegant solution if you are serious about CD.
Great post, pretty much agree with you on all points.
Very nicely-explained. This model makes a lot of sense to me and seems much cleaner than gitflow, and aligns with my preference for rebased –no-ff merges (as opposed to other “one-long-lived-branch” models I’ve seen that insist on only ff merges). Definitely going to try to implement this in practice. The level of detail in your explanation is really helpful! Thanks.
In Feature development | Integration the following is recommended: “The branch is pushed to a centralized repository that is used for code review and CI testing.” and “Once the branch is considered good, the commit history is cleaned up as needed, and the branch is force pushed to the remote.”. As a Git newbie I’m confused: are there 2 remote repositories, one with master branch and one with code review and CI branches?
Actually, there may be more than one remote serving different purposes as you suggest. However, the most common set up is to use a single remote (called “origin”). The point is that all reviewing/CI-testing/history rewriting is done against a single feature branch, and once it is ready for integration it will be merged to the master branch (that may or may not be on the same remote as the feature branch).
I spent a while sketching out a branching model that would meet my needs for a stable default branch & release branches for client instances, then found this to match. Glad to read that I was on the right track… and the details here are excellent! Thanks!
This is the best git work flow I have read, thank you.
Your article is the best explanation I’ve found on the git cactus/trunk based model
Many thanks
This was really good. Thank you!
After reading dozens and dozens of articles on how to use the trunk-based strategy, finally a well explained article where things are not contradictory.
Thanks for this detailed and thorough explanation. I’m just sorry I didn’t find it sooner.
Is this (effectively) the same model now known as GitLab Flow?